I’m a proud owner of a launch-day PS4 Pro, it’s brought me nothing but joy over the years as it enhanced games I loved and games I would come to love post-release. However, just like thousands of others out there, it’s had its fair share of troubles over the last few years – namely in regards to the heat it generates and the subsequent noise the fan makes whilst trying to cool the system down. Well, I took a gamble and I bought a few products to ‘fix’ the issue and to my surprise, my PS4 Pro actually runs quieter than my base PS4!
I don’t have any fancy tools which have tested the noise levels before and after, so all I have are my descriptions and opinions of the results. But, let’s just say that before I applied the methods below, I was sat around two meters from my TV and playing almost any intense game would result in having to wear headphones to actually hear the game, it also made playing at night a pain due to the noise. Now, I played DOOM Eternal in 4k mode and an unreleased game in its native 4k mode for over five hours straight yesterday and when I muted the TV after a few hours, I could barely hear the fan – it’s a night and day transformation.
Also, a few days ago I had a few games randomly turn the PS4 Pro off – the game would start but then it would beep and the system shut itself down – what I did yesterday fixed this and all games now work perfectly. So, if your console also shuts down randomly on a few games, after hearing the fan get really loud, it’s an issue with the heating and this will fix it for you. So, what did I do…
The items you’ll need
The first thing to mention is that your warranty will be voided by doing this, although I imagine most of you have a launch-day console like me, so the warranty died a long time ago. It also requires a bit of patience as it can take upwards of an hour if you’ve not done it before.
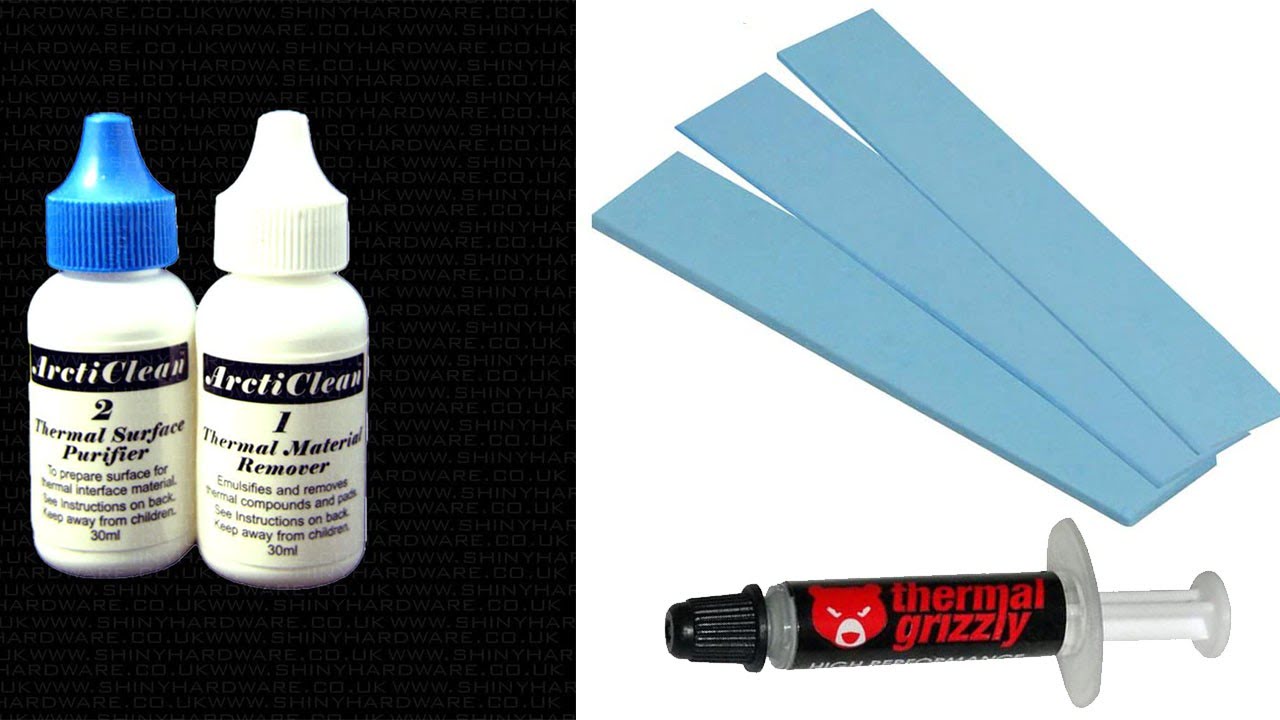
These are the tools/items I used:
T8 Torx Screwdriver: https://amzn.to/3asMZap
Phillips #0 Screwdriver: https://amzn.to/3bxFEYy
Arctic Silver ArctiClean Thermal Material Cleanser (60 ml): https://amzn.to/3cH0ogu
Arctic – Thermal Pad 120 x 20 x 1.0 mm: https://amzn.to/350kgsh
Thermal Grizzly Kryonaut thermal: https://amzn.to/2zh3JEC
Cotton buds or a lint-free cloth
You don’t need to grab the exact screwdrivers I used but I highly recommend getting the same paste, pads and cleaner. I have used another brand of paste previously but, as you can see in the image below, it literally melted and no longer provided any support to the processor at all.
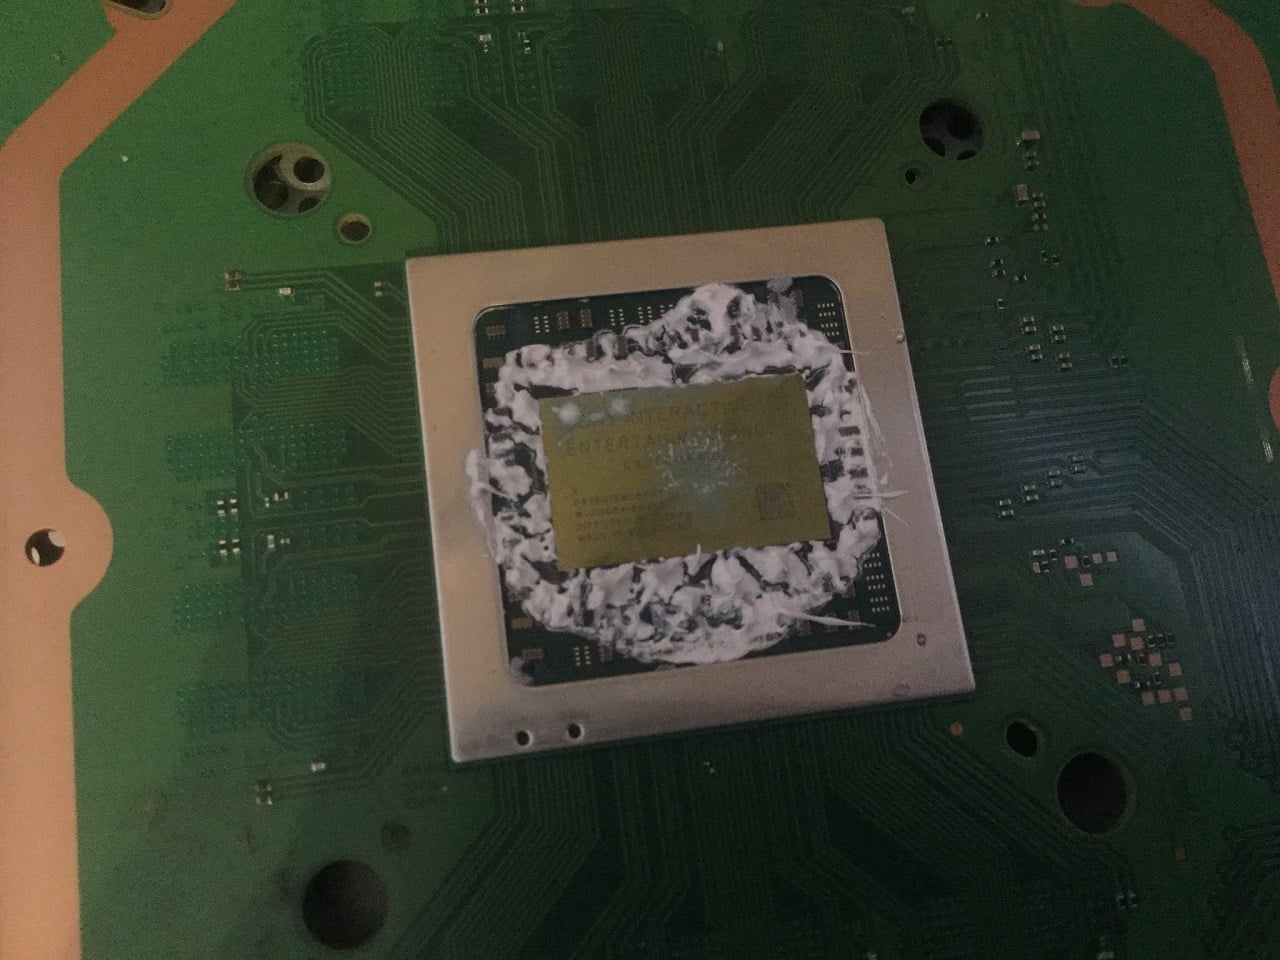
The thermal paste has literally melted off the processor, no longer offering support!
Step one – Open up your PS4 Pro.
Rather than go into detail with how to open up your device, I thought it would be easier to show you the video I followed by TronicsFix. He talks you through the process step-by-step and explains fully what he’s doing each time – unlike other videos on YouTube which tend to play music as it speeds through what’s going on. If you watch him up until the ten-minute mark, you should have your device in pieces – this is where you can start Step two. The only problem is that he doesn’t re-assemble the unit in the video, so you’ll need to watch it back if you get confused about what goes where later on (it’s not difficult).
.
Step Two – Remove the existing paste
Once you have everything apart, it’s time to clean the old ineffective paste off both the APU and the copper part of the heatsink. To do this, apply a few drops of the first solution from the ArctiClean kit and wait for around 30-seconds. Once the time has passed, the old thermal paste should come off with ease. If you’ve never done this before – it’s a bitch to get off if it’s on your fingers or clothes, so ensure you don’t touch it or put a dirty cloth on your clothes or floor. I used cotton wool buds to clean mine, along with kitchen roll, but a lint-free cloth will also work (as is recommended).
Once both the processor and the copper panel are clean – you don’t need to remove it all, but the more you get off, the better – then give it a once-over with your cloth or cotton buds to ensure there is no excess solution. Next, apply a few drops of the second solution in the ArctiClean pack to both surfaces, then wipe it with a cloth as it will evaporate quickly. This solution is prepping the surface for the new thermal paste, giving it a more ‘sticky’ texture so that it doesn’t simply slide off.

Yellow = replace thermal pads. Pink = replace the thermal paste.
Step Three – Apply the new paste and pads
Now everything is clean, apply a small dot of thermal paste to your APU – it should be around 3mm in size (like a small pea). Once done, use the provided spatula to evenly spread it out over the entire silver processor – you may need to apply a little pressure as it’s quite a thick paste. Then, it’s time to replace the thermal pads. The first ones we’ll do are on the component with the copper panel we cleaned. Remove all six pink thermal pads from this part of the unit.
Now, if you bought the thermal pads I advised, it’ll arrive in a strip – you need to cut out six pads that are just big enough to fit on the black chips those pink pads were previously aligned with (see the image above). Be accurate with the strip of thermal pads as I only just had enough to do all the chips I needed to. Once you’ve cut them out, peel off the plastic protection on both sides of the pads and place them directly on the chips next to the processor. Then, put the motherboard back into this metal chassis, so that the processor is now pushing against the heatsink.
At this point, re-attach the X-clamp so that the motherboard doesn’t move about and dislodge the pads you placed.
Whilst you have the thermal pads out, look under the silver cover you took off the X-clamp originally, you’ll see eight more pads stuck to it – remove them all. Once again, cut to size eight pads to place upon the RAM chips which are located around the X-clamp, peel off the plastic, and stick them to the chips directly. Now, put the metal cover back on and screw it down so that it keeps the pads secure.

Ensure everything is connected before you seal it up.
Other cleaning options
If you wish, whilst you have your unit in pieces, you can clean out your fan (which you should have easy access too) if it’s really dirty – a bit of compressed air will do the trick, as will a lot of forceful blowing. However, my fan was spotless so I never touched it.
Reassemble your PS4 Pro
Carefully put your console back together – ensure you don’t miss any of the cables or the three wireless wires. As I said, as good as TronicsFix’s video is, he doesn’t show himself putting it back together, so you may need to skip through the video and watch him so you can do the opposite. The hardest part for me was figuring out where all the screws go! Basically, if the hole has a triangle next to it then it’s a black screw, and the silver screws go around the outside of the chassis to hold it together.
Once it’s all together and you’ve sealed it all back up again, sit back and turn it on – if your Pro was a jet engine before, you should now be just as shocked as I was when you get to experience new silent-running gaming! As I stated previously, over three hours of DOOM Eternal and the fan was barely making a noise – Resident Evil 3 Remake didn’t even sound like the console was on, I had to check the fan was working!

Get back to playing those quality games!
So, how’d you get on? Did this fix your noisy PS4 Pro? If so, I’d love it if you could possibly share this article with your friends and others who you know are having the same noisy issue (or random shutdowns due to heat). As a caution, I have to advise that none of us here at GamePitt takes any responsibility for any damage you may cause by opening up your PS4 Pro – if you follow the guidelines above and do exactly what TronicsFix does in his video, there won’t be any issues. If you have any doubt or issues with opening your device, maybe ask someone more tech-savvy to help you out?
Also, now that you’re living the silent life, check out some of our reviews for games which may have once caused your Pro to up-stage the TV when you played them.
Share this article!